This page last updated Jan 9, 2023
Here are a few LED related projects that I have done lately. If you are adding pixels to your art project you may find some handy information in this presentation I did a while back:
Send me a note if you want further information on any of these projects.
Laser Tube
We have a Laser Cutter at my local makerspace (VHS – Vancouver Hack Space) and the tube does need to be replaced every once and a while.  A few years back we purchased a spare tube but found that it was no good when we tried to use it. Normally when the tube is ready to be replaced it is quite dirty. But as this one was never used it was perfectly clean and looked quiet beautiful.. It looked like a perfect item to light up with LEDs!!! I laid it on top of a WS2812 LEDs and ran a rainbow pattern. It looked great but I had to find a way to mount both the tubes and the LEDs.
I played with various designs and decided to make a box out of MDF (to house the power supply and controller) and use brackets to hold the tube. I wanted something that could support the tube no matter what orientation the box was mounted. I used MDF scraps I had in my shop and some metal brackets I got at Home depot.
 First I cleaned off all the decals and various stickers that were on the tube using various thinners.
 Then I built the box using MDF scraps that I had in my shop, Used plenty of glue and brad nails to hold it together.
Finding a way to securely hold the tube was a challenge. I ended up making some half circle brackets out of plywood. The tube will sit in the bracket and be held in place with a small piece of thin aluminum sheet wrapped around it (and screwed to the bracket)
I also added a large angle bracket to hold each end of the tube (to stop it from sliding). I cut a opening in the box and secured these inside the box. I also added a section of aluminum channel to hold the LED strip.
Then I installed the LED strip in the channel (I used the 144 LED per Meter WS2812 strip) and ran the wires through a hole in the bracket to the inside of the box.
Then I placed the laser tube on the brackets and used the aluminum strips to hold it in place.
You can see the ends of the tube rest against the metal brackets. I used silicone to secure the ends to the brackets so the tube is not able to slide.
This allows the lasertube display to be mounted in any orientation.
For the electronics I originally used a NodeMCU with some NeoPixel example code running simple patterns. I then added a DF Player MP3 module and speaker. One of the other VHS members wrote some code that played a laser sound and animation when a button was triggered.
I built this display a few years ago and only recent got around to thinking of mounting the tube on the wall in the VHS premise. I decided to replace the controller and use a remote power supply to allow for easier mounting and remote control. I will re-install the sound module and allow for a remote push button to trigger the laser effect eventually.
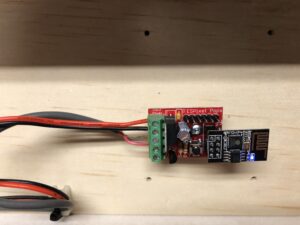
For the new controller I used an ESP-01 based ESPixelPOP pcb running the WLED firmware. The ESPixelPOP is very compact and easy to build. WLED gives me a wide variety of animations (the video at the beginning is running the Meteor effect) and control options with the option to still use E1.31 (DMX over Wi-Fi Ethernet).
Here is a video of the LaserTube installed at the VHS.
Arrows
A friend gave me some LED traffic direction signs like you see on the back of traffic flagger trunks. These are made of heavy duty aluminum extrusion with very bright orange LED modules. The modules can be controlled individually to make the sign point in the desired direction. I cut the 2 doubled ended arrows in half to make 4 single arrows and decide to wire them together in a row.
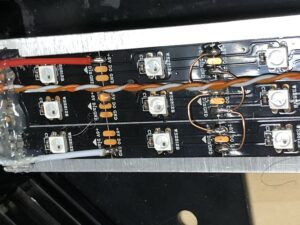
I removed the PCB led modules and replace them with sheet aluminum strips cut to the same size. I then mounted WS2812 strips (30 LED/meter) onto the aluminum strips (there was enough room for 3 widths of LEDs).
 I wired the data input to the strips in parallel so that all the LEDs in a vertical row act the same and grouped the chevron sections to align with the same positioned LEDs in the main section.
I used bare copper wire to tie the power connections together and used stranded pairs (from cat5 cabling) for the various data lines. At the end of each arrow I installed a small plastic box to make the connections and added connectors for power and data in and data out. I wanted to have a controller in the first section and drive the power and signaling through a single line connecting the arrows.
The box had just enough room to mount an ESPixelPOP PCB and still allow room for the power and data cabling. I used Cat5E cabling for the data (just a single pair ) and outdoor rated landscape lighting cable for the power.
I covered the controller with some heat shrink tubing to protect it from shorting out to anything. I loaded WLED on the the controller and was able to run some patterns right away.
My plan is to daisy chain the 4 arrows in a row with the controller in the first one. I will power them with a remotely located power supply.
Cylon Paper Towel Dispenser
We got some new papertowel dispensers at VHS and someone happened to mention they looked like Cylons… So I added a sound module and some pixels along with a Arduino NANO to make them so
I rigged up a small NANO driven circuit with a DF Plyer MP3 player module. A opto couple monitors the motor driver of the dispenser and when activated it plays a sound file and does a LED for the sound duration.
 I used some old laptop speakers in order to fit everything into the battery compartment. I then used a remote 5V power supply. It was a bit of a tight fit.
Basically everything is held in place with hot glue or foil tape. I used various sound bites I found on the web. Even a small SD card can hold an endless number of sound files (I only used 30 or so). You can find more info on the VHS web site:
https://talk.vanhack.ca/t/cylon-paper-towel-dispensers/12401
RGB LED Panels
At the VHS we had a pile of left over P10 style 16×16 RGB LED panels from a donated video wall that was restored. They are 1/4 scan so a bit old and not seemingly all that well supported with the various current libraries. I did cobble together a few projects totally based on code I found on the web.
You can find more about this project on the VHS site:
https://talk.vanhack.ca/t/vhs-rgb-panel-project-2-pixel-panel-artsy-display/12444
You can find more about this project on the VHS site:
https://talk.vanhack.ca/t/vhs-rgb-panel-project-3-tetris-clock/12449
RBL (Really Big Lights)
 Every year at Christmas Home Depot sells these battery powered large C9 style lights. They are about 13 inches long and have a battery powered LED that lights them up.
  The lights come in a few colors but the white ones are great for retrofitting with pixel LEDs!!! Each year I buy a few more white ones when they go on sale. I rip out the battery holder and LED and then squeeze in a bundle of bullet style pixels. I use 7 pixels in mine.
I control mine using WLED software on a ESP8266 controller. I used long Ethernet patch cables to connect mine to the controller. In my case the cables are 20 feet long. To avoid issues with the long cable runs I use a 74HCT125 buffer between each fixture.
Sound Reactive Bar
I made this with some Govee branded LEDS bars that were missing the controller. Turns out the Govee fixtures use 12V WS2811 based LEDs so I used a ESP32 based controller running the Sound Reactive version of WLED. I mounted it at the top of the noisy (at least when you stomp on them) stairs at the VHS Makerspace.
Strobes
These are some old industrial strobe light fixtures that I retrofitted with WS2812 LED strips. Each fixture has 74 pixels wrapped around a piece of PVC tubing glued in the center of the fixture. These will also be controlled by a ESP32 running the sound reactive version of WLED.


